In a nutshell
- 🧪 How it works: gelatin forms a peelable, occlusive film that hydrates and lifts micro-flakes, while fruit acids (AHAs: lactic, malic, citric) dissolve dead-cell bonds at a skin-friendly pH ~3.5–4.5.
- 🥣 DIY method: Bloom ~1 tbsp gelatin in 100 ml water, warm to clear, cool to warm, then mix in 20–30 ml of a pH-balanced AHA solution to reach ~4–6% acids; apply 10–15 minutes, peel off, and rinse.
- 💧 Aftercare: Seal results with urea cream (10–20%), wear cotton socks, use sunscreen if exposed, repeat every 1–3 weeks, and avoid stacking acids or using retinoids on feet for 24 hours.
- ⚠️ Safety first: Patch test, avoid open cuts, infections, eczema flares, or cracked/bleeding heels; those with diabetes or poor circulation should consult a GP/podiatrist; rinse immediately if burning occurs.
- ✨ Benefits: Instant softer feel and brighter soles, even exfoliation without harsh scraping, controlled contact time, and a budget-friendly alternative to salon peels.
Calloused heels, chalky soles, that tired grey tint — feet work hard and show it. A salon-grade peel can blitz the build-up, yet a clever kitchen-science alternative is winning fans: a DIY gel peel powered by gelatin and fruit acids. It’s quick. It’s oddly satisfying. And when done sensibly, it can be impressively effective. Think of it as a soft, peelable boot that coaxes away dull, compacted skin while leaving the living layers calmer and better hydrated. The trick is pairing a film-forming gel with mild, well-behaved acids so the outermost cells release without drama. Here’s how the chemistry works — and how to do it safely at home.
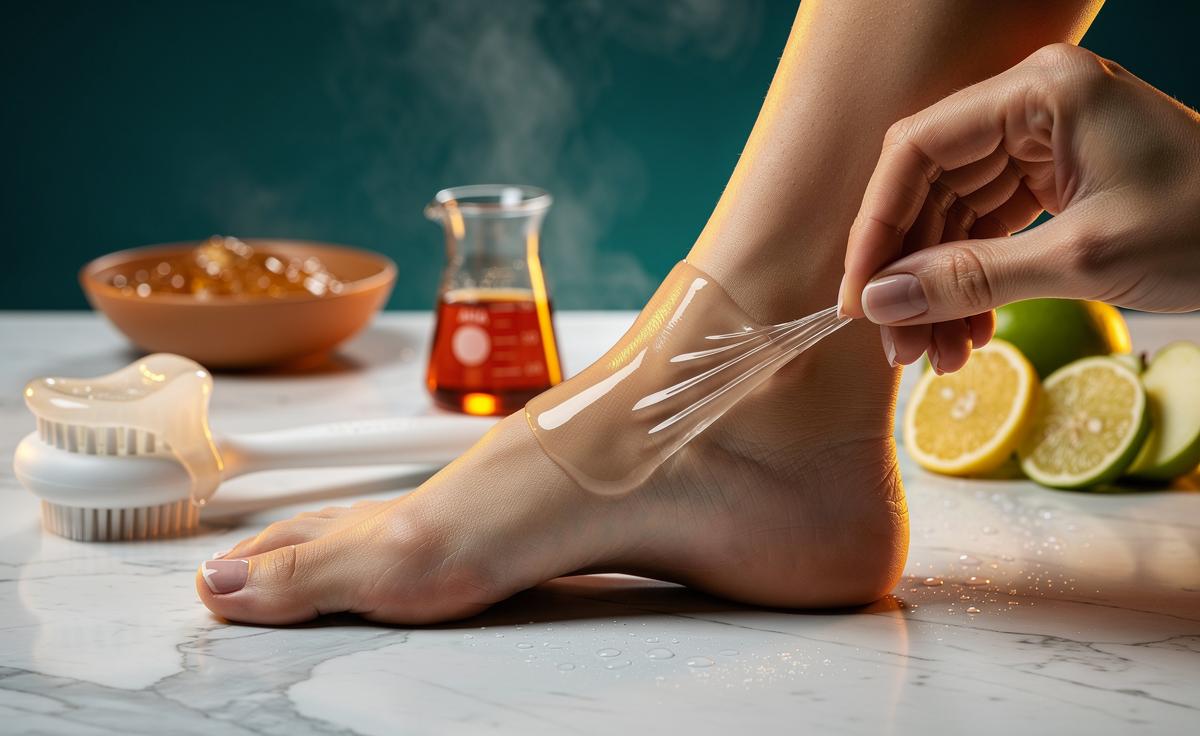
Why Gelatin Creates a Peelable Foot Mask
Gelatin is denatured collagen. Dissolved in warm water and cooled, it forms a thermo-reversible gel that dries into a flexible film. On feet, that film acts like a temporary sock: it hugs contours, seals in moisture, and delivers actives evenly. That tight, glossy coat is not just for theatrics. It produces occlusion, reducing water loss so the skin beneath becomes plumper and more pliant. Hydrated corneocytes — the flat cells in the outermost layer — loosen their grip, priming rough patches for painless removal when the gel lifts away.
There’s also gentle “mechanical intelligence” at play. As the gelatin dries, it grips the loosened debris and micro-flakes, then releases in one satisfying sheet. No scraping. No aggressive abrasion. Because the film is self-limiting and clings mostly to dead cells, the risk of overdoing it is lower than with harsh files. The result: smarter exfoliation with a cleaner finish and less mess in the bath.
Texture matters too. A slightly bouncy gel holds acids in intimate contact with the thick heel skin, where they need time to work. It stays put between toes, won’t drip like a watery toner, and peels off cleanly. That controlled contact time is where the magic happens.
Fruit Acids at Work: Lactic, Malic, and Citric Power
Enter the alpha hydroxy acids (AHAs): gentle, water-loving exfoliants that dissolve the “glue” between dead cells. Lactic acid is a star for feet because it’s both keratolytic and humectant, softening while pulling in moisture. Malic acid from apples adds a broader, slower nudge, and citric acid from citrus acts as a brightening chelator, tidying up dullness. Together, at a skin-friendly pH around 3.5–4.5, they coax the stratum corneum to shed evenly. Feet have thicker, tougher keratin. Mild AHAs are ideal: capable, yet civil.
AHAs differ from salicylic acid (a BHA); salicylic digs into oil and excels on warts or very hard plugs but can be too punchy for a broad, leave-on gel. The AHA trio targets surface dullness and fine scaling while minimising sting. Keep acid strength modest — efficacy comes from even coverage and measured time-on-skin, not bravado.
| Acid | Common Source | Typical Home-Use Range | Main Benefits |
|---|---|---|---|
| Lactic | Milk, fermented sugars | 4–8% in final gel | Exfoliates + hydrates |
| Malic | Apples, pears | 3–7% in final gel | Gentle resurfacing |
| Citric | Citrus fruits | 2–5% in final gel | Brightening, chelation |
Blend them within these ranges and you’ll feel a swift softening after one session, with a smoother look by morning. That’s the “instant” moment: touchably better texture, fewer snaggy patches, a cleaner heel silhouette.
DIY Recipe and Method: A Safe, Sensible Foot Gel Peel
You’ll need unflavoured gelatin, clean water, and a mild AHA solution. The most reliable route is a fragrance-free lactic or AHA blend at 5–10% sold for face and body; it’s already pH-balanced. In a heatproof jug, sprinkle 1 tablespoon (about 9 g) gelatin over 100 ml cool water, let it bloom five minutes, then warm gently until clear. Allow to cool until just warm to the touch, then stir in 20–30 ml of your AHA product to reach roughly 4–6% total acids in the gel. Add acids only once the gel is warm, not hot, to protect potency and reduce sting.
Work on clean, dry feet. Paint a generous layer with a brush over soles and heels, avoiding open cuts and inflamed areas. Sit on a towel and keep still while the gel sets; five minutes is typical. Apply a second coat for a stronger film if needed. Leave on for 10–15 minutes depending on comfort. You’ll feel a prickly tingle, not a burn. Peel away in sections from the edges. Rinse with lukewarm water and pat dry.
Finish with a urea cream (10–20%) to lock in softness and support the acid’s work. Limit the peel to once every one to three weeks depending on callus build-up. Do a patch test on the arch 24 hours before your first full application. If you’d rather a “pantry” version using lemon juice or fruit purée, dilute heavily and keep time-on-skin short; natural acids vary wildly, making results unpredictable. Purpose-made AHA solutions are safer and more consistent.
Aftercare, Results, and Who Should Avoid It
Expect a two-phase payoff. First, the immediate glow: the gel lifts superficial ashiness and rough micro-flakes, so feet look fresher right away. Second, a subtler refinement over 24–48 hours as hydrated cells shed more evenly. Keep the momentum with nightly cream, cotton socks, and sunscreen if your feet will see daylight; AHAs can increase sun sensitivity. For stubborn heel armour, alternate this peel with a 20–30% urea ointment or an occasional pumice on damp skin. Avoid compounding acids on the same day and skip retinoids on feet for 24 hours.
Not everyone should peel. Skip DIY acids if you have diabetes with neuropathy, poor circulation, active athlete’s foot, eczema flares, or cracked, bleeding heels. Seek advice from a GP or podiatrist instead. If stinging turns sharp or skin blanches white, rinse immediately. Remember: thickness of soles varies; keep sessions conservative until you learn your tolerance. The aim is steady refinement, not a dramatic shed. Done well, this is a tidy, budget-friendly routine that earns its place beside your nail file and heel balm.
Foot care doesn’t have to be brutal to be effective. A gelatin film and fruit acids create a clever partnership: occlusion for hydration, chemistry for controlled release, and a peel that lifts debris without the grind. It feels a little scientific, a little spa-day, and it works. In a world of overzealous scrubs and razor-thin margins between “smooth” and “sore,” this method sits comfortably in the sweet spot. Ready to swap the rasp for a smarter gel and see how your soles respond — or will you tweak the formula and craft your own perfect peel?
Did you like it?4.5/5 (29)